Microscopes and the Amateur Mycologist - a Beginner's Guide
The information below is a summarized extract from Pat O'Reilly's book, 'Fascinated by Fungi'.
Microscopy and Photomicography
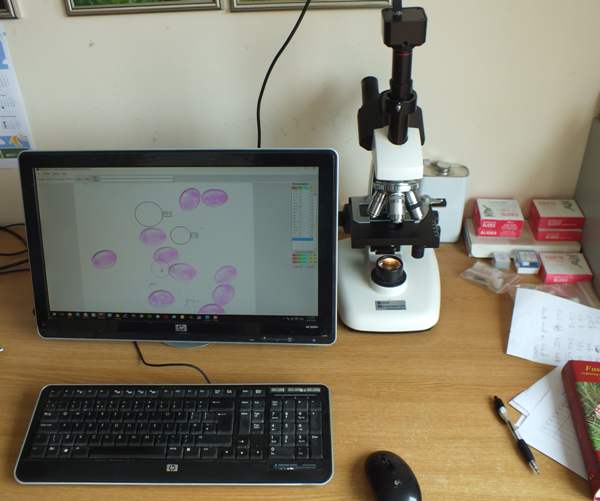
When you can’t identify a fungus in the field you might want to bring a sample home for further study. There is no point in doing so unless there is something that you can do at home that you couldn’t do in the field. Microscopic investigation is something best done indoors when you have enough time to do things properly. Here are a few tips on choosing and using a microscope for this purpose.
Toy microscopes are okay for looking at animal and plant structures, but for mycology you really do need a good microscope. That’s because the fine structures of fungi are very small - some are close to the limit of what can be resolved using light. X-ray wavelengths are much shorter than those of light waves, and so much more detail can be studied using x-ray microscopy. But if you think an optical microscope is an expensive tool for something that for most of us is just a hobby, don’t even contemplate remortgaging your house for a bottom-of-the-range x-ray microscope.
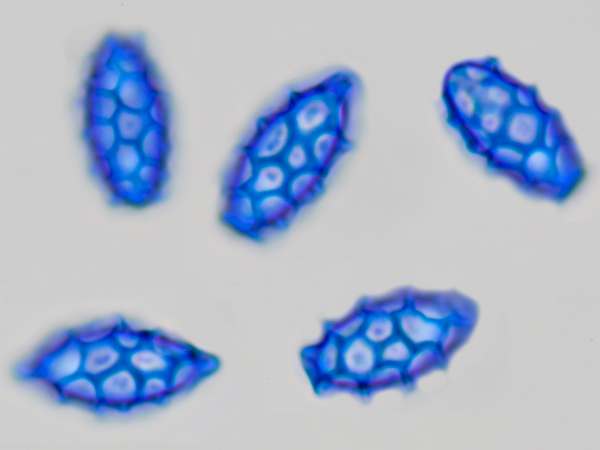
Spores of Lactarius azonites, seen via an oil immersion microscope lens
To study fungal spores, basidia, cystidia, sphaerocysts and other tiny features of fungi you will need a microscope capable of at least x 400 magnification. Ideally, go for a microscope with a maximum magnification of x 1000, but to obtain reasonably clear images at such high magnification it should have an oil immersion lens.
Dimensions and ornamentation (spiny warts, for example - see picture, left) of spores are key identifying features, and so that you can measure the dimensions of things that you are looking at you will need an eyepiece that has an ocular micrometer or some other means of calibration. If you find the instructions provided with the microscope confusing (or if you are lucky enough to pick up a second-hand bargain without a handbook), someone in your local fungus group will almost certainly be willing to help you to set up and calibrate your system.
My own microscope is trinocular and so either a digital camera adaptor or USB camera is usable even while I am looking through the eyepieces. (Much of the time I simply observe the image that is transferred via a USB lead to my computer screen.)
Other ‘must-have’ microscope features include:
- Adjustable illumination, most often from directly below the slide, and termed brightfield illumination. (For biological instruments darkfield illumination is also from below but at an angle that ensures direct light doesn't enter the objective; it requires either a special darkfield condenser or, for low magnification, a black stop inserted in the light path.)
- Control knobs for moving the mechanical stage that holds the slide
- Coarse and fine focus controls
Staining chemicals
Sphaerocysts in the stem structure of Russula cyanoxantha, a woodland mushroom commonly known as the Charcoal Burner, are responsible for its brittleness. This picture was taken via a microscope with x600 magnification. The stem material on the slide was stained with Congo Red.
The fine structure of spores and many of the other tiny parts of fungi that you will want to look at under the microscope are almost completely translucent. They can be seen clearly only when they have been stained. As a further aid to identification many fungi produce spores that change colour when in contact with certain chemicals, referred to as reagents (because of the reaction when spores come in contact with them). Here are some of the chemicals, stains and reagents most commonly used in mycological microscopy:
Distilled water
(Yes, good old H2O!) If you want to view tiny subjects and see their natural colours, water is the ideal wetting agent. Tap water contains chemical additives that could limit the lifetime of a slide, and rainwater is acidic and equally problematic, but distilled water is inexpensive and readily available. You might need to add a drop of photographic wetting agent to avoid image distortion due to tiny air bubbles attached to spores or other subject material. (Washing-up liquid works!) Adding about 10% of glycerine will ensure that slides last a lot longer before drying out.
Ammonia (NH3)
This useful but potentially dangerous chemical gives off an extremely pungent vapour, and so the bottle needs to be securely capped at all times except during use. (Household ammonia from any hardware shop is fine.) As well as a reagent, causing colour change in some kinds of fungi, ammonia is a component of certain other reagents. Pure ammonia is a gas at normal room temperature, and for mycological use a 10% solution in distilled water is the normal concentration. That is strong, and if it gets into eyes it will cause serious damage.
Ferrous sulphate (FeSO4)
Many fungi fanciers and mycologists carry in their field kit a crystal of ferrous sulphate, known colloquially as Iron Salts, for rubbing on fungi (brittlegills in particular) to check for a colour reaction. Don’t go to the expense of buying pharmaceutical grade crystals; the stuff sold in garden centres as a moss killer and for lowering the alkalinity of soil is dirt cheap (oops!) and works just as well.
Potassium hydroxide (KOH)
This is used both as a mounting medium (usually together with a staining chemical) and as a reagent, either in the field or back at base. Cap or gill surfaces of some mushrooms change colour dramatically when contacted by KOH; they can turn yellow, red, magenta, olive or black, for example, depending on the species. So when you make a microscope slide using KOH not only is it preserved against decay but you may also elicit a diagnostic colour reaction that can sometimes contribute as much to the identification process as do the size and shape data obtained via the microscope.
Melzer’s Reagent
This cocktail of chemicals is difficult to obtain because one of the crucial components is the potentially dangerous substance chloral hydrate (a date-rape drug). The other components are easy to acquire – iodine crystals, potassium iodide and distilled water. Iodine reacts with starchy substances to produce an intense blue-black colour, and fungal spores that contain starch are referred to a ‘amyloid’. If you join a fungus group in the UK, you may be able to obtain Melzer’s Reagent via the Association of British Fungus Groups (ABFG). Spores from fungal species may undergo diagnostic colour changes when stained with Melzer’s Reagent. Spores are termed:
- Amyloid if they turn a blue-black colour.
- Dextrinoid if they turn a reddish-brown colour.
- Inamyloid (or negative) if they merely turn yellowish or do not change at all.
These terms are used in field guides that list the chemical test characters for each species.
Stains

Asci of Poronia punctata, Nail Fungus
The main reasons for using stains when making microscope slides are to:
- enhance the contrast in a microscopic image
- highlight particular tissue structures
Often stains are used together with other chemicals that help to prevent decay or drying out of the subject material.
Examples of staining agents include:
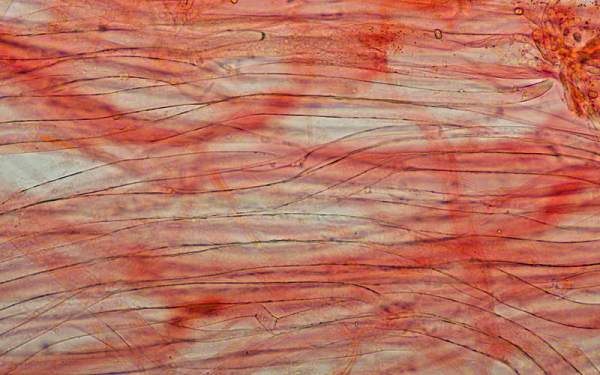
Congo Red
An excellent general-purpose stain for looking at the fine details of hyphal structures (for example see the Amanita rubescens gill trama picture, right, where the marked dimensions are in microns.) It is supplied as powder and is best dissolved in a 10% ammonia solution.
Safranin
Another stain that produces red cell nuclei.
Lactophenol Cotton Blue
This stains chitin, making such structures as spore ornamentation show up much more clearly than they do with most other stains (including Congo Red).
A parting shot - well, this one is more to do with avoiding departing. The chemicals mentioned above include some seriously caustic, acidic and toxic substances, and so they really must be stored where children can’t get hold of them. The fumes from ammonia, for example, can burn eyes - in fact some tests merely require ammonia vapour to pass over fungal tissue to invoke a colour change.
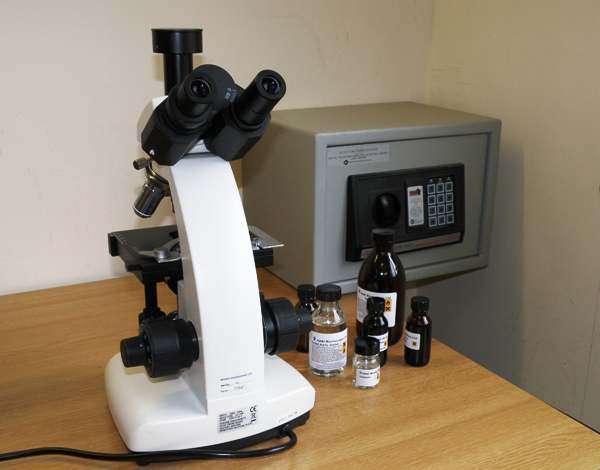
A secure safe could save a life. I have one bolted to the wall next to the bench where I keep my microscope (see picture above), and it is ideal for storing chemicals, razorblades, glass slides etc.
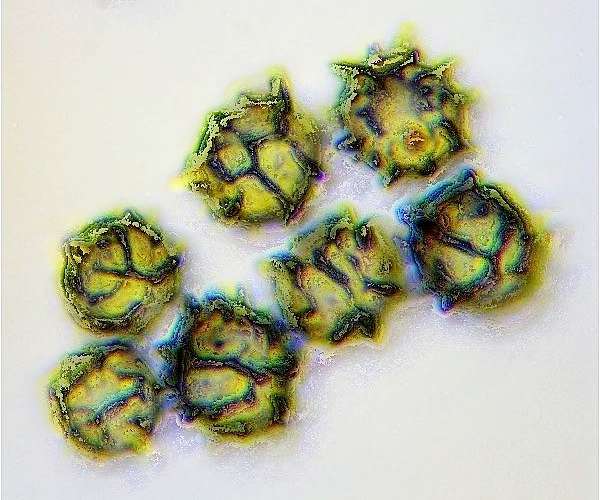
Above: spores of Orange-peel Fungus Aleuria aurantia
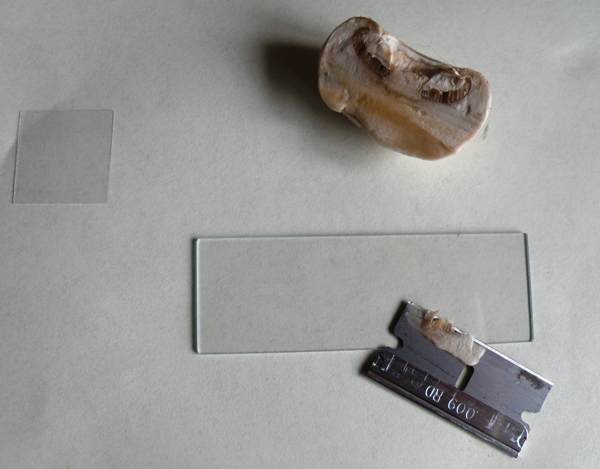
Making Slides
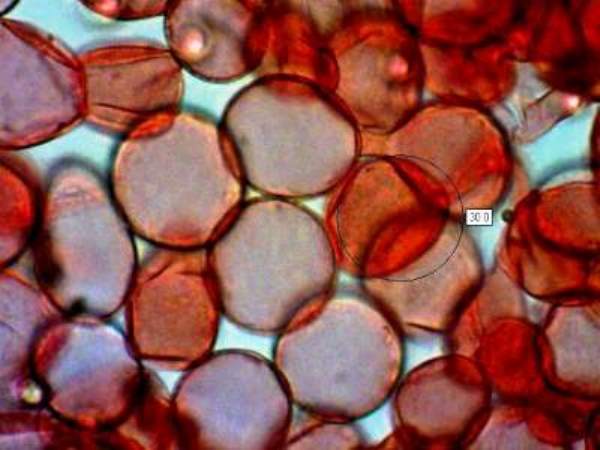
The easiest slides to make are of spores. (Shown here are spores of Agaricus bisporus, the commercial button mushroom always available in grocery shops and supermarkets.) All you have to do is to place the fungus, fertile side downwards, on to a microscope slide and wait an hour or two.
Unlike when trying to make a nice spore print you don’t even need to cover everything over, although I generally do just as a reminder that there is a sharp-edged piece of glass underneath. Because you want to be able to see separate spores rather than determine the colour of spores when piled layer upon layer, you don’t need a dense print and so you mustn’t leave it too long.
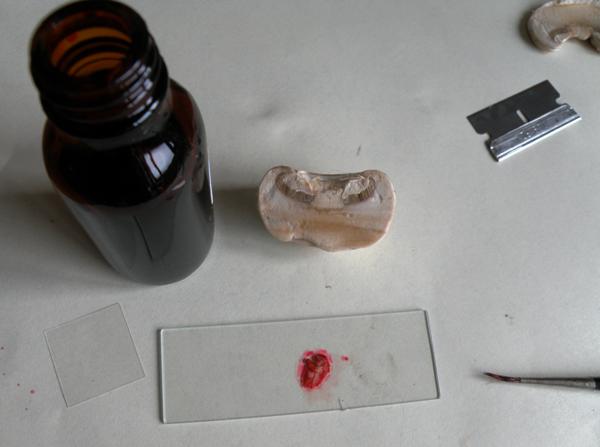
Once you have some spore dust on the slide, add a drop of wetting agent (soapy water will do!) or a suitable stain if the spores are clear rather than coloured, and place a cover slip on top. Melzer’s reagent is a good choice because at the same time as improving the contrast, if you hold the slide up to the light you will be able to see whether the spores are amyloid, dextrinoid or inamyloid - of which more later....
Making slides from very thin slices of fungal tissue is more difficult, and you should expect more failures than successes. The difficulty is creating a really thin and even slice that contains the features you want to study. On the gills of an agaricoid species you might wish to study the basidia - the (usually) club-shaped hyphal extensions on which sterigmata and spores are borne.
Once you have cut off a thin sliver using either a sharp razorblade, or torn off a strip using a pair of needle-nosed tweezers, the process is the same as for spore slides. Place your specimen on a slide, add a few drops of stain and then a cover slip, applying slight pressure to flatten the section. Be gentle: most cover slips are little more than one tenth of a millimetre in thickness, and they break very easily. Remove any excess stain using an absorbent tissue and then wait a few minutes until the stain has permeated the specimen.
A variation on this approach – rather easier but more of a hit and miss technique - is to squash a fairly thin specimen between two slides - with luck the bits you are interested in will spew out at one of the edges. Use stain as before to highlight these edge features.
When studying basidiomycetes under a microscope you are not limited to spore size and shapes. You can also investigate various kinds of cystidia. These are hyphal structures that stand out from various surfaces. Depending on where they occur they are given different name: pleurocystidia occur on gill faces, cheilocystidia are those on the gill edges, pileocystidia occur on the cap surface, and caulocystidia are those found on the stem of the mushroom. The shapes of cystidia in each of these locations may be different, and these differences can help you to, er… differentiate between species.
The photomicrograph shown above is of gill trama from Hygrocybe chlorophana, the Golden Waxcap. Not all waxcaps can be identified to species level by examining macroscopic characters. Some are best determined by examining them under a microscope, while a few need both macroscopic and microscopic examination. Squashing a tiny piece of gill material (gill trama) between a slide and cover slip allows you to study the structure of the tissue. Some have interwoven hyphae; some are regular (hyphae lying parallel to one another) and others are subregular (somewhere between the two). The long cells of Hygrocybe chlorophana are clearly visible here, whereas the hyphal cells of for example Hygrocybe miniata, the Vermillion Waxcap) are much shorter.
Software to make microscope photography less of a misery
If you have ever tried to take a photograph of spores or other pieces of fungal tissue under a microscope you will know how difficult it is to get everything in focus. You get one part sharp and the rest is blurred. The problem is caused by the very limited depth of field available at high magnification. Specialist but inexpensive software can come to your rescue. You take several images focusing at different depths into the tissue sample, and the software constructs a picture using the in-focus parts of your various images. For example, CombineZP, originally developed by Ian Hadley and generously made available as freeware (for Windows PCs), creates an extended depth-of-field image from a stack of similarly sized images focussed progressively through the depth of, for example, a fungus spore/spores.
Microscopy is a specialist subject and not something that everyone interested in fungi wants to get involved in. For much more information on this subject there are specialist texts, and for help in choosing and setting up a microscope the websites of reliable independent suppliers such as Brunel Microscopes are a good starting point. It’s usually possible to arrange a visit to discuss your specific needs and try out a few alternatives.
Examples
On many of our fungi species pages you will see examples of spore photographs taken using a microscope with a digital camera attachment. For example, see Laccaria bicolor, which has interesting spore ornamentations; and Cuphophyllus pratensis, which has ellipsoid or tear-shaped to subglobose spores.

Fascinated by Fungi. Back by popular demand, Pat O'Reilly's best-selling 450-page hardback book is available now. The latest second edition was republished with a sparkling new cover design in September 2022 by Coch-y-Bonddu Books. Full details and copies are available from the publisher's online bookshop...
